To remove glued hardwood flooring, first identify the type of glue and prepare your work area. Clear the room and guarantee ventilation. You’ll need safety gear like glasses and gloves. For mechanical removal, use a heavy hammer and chisel to lift the flooring edges and a circular saw to cut into sections. To soften the glue, apply a heat gun or a suitable solvent. Then, scrape off the softened glue with a floor scraper or chisel. Tackle stubborn spots with a heat gun and finish by cleaning the subfloor.
These steps can be followed to remove the hardwood flooring from concrete and engineered hardwood floors. Ready to find out how each tool specifically makes the job easier?
Understanding Glue Types
To effectively remove your hardwood flooring, you must first identify the type of glue used, which can range from mastic to resin and adhesive-based glues. This step is important because each glue type has a different removal approach, especially when dealing with glued-down wood over a concrete slab.
If your flooring is attached with mastic glue, you’re likely dealing with a concrete subfloor. Mastic is popular for its ease of use on concrete but doesn’t bond as aggressively as other glues. This characteristic might make the removal process a bit less challenging. On the other hand, resin and adhesive-based glues, known for their robust bonding properties, can be a challenge. These glues aren’t just limited to concrete slabs but can be used on various subfloors. Their strong adhesion means you’ll need to prepare for a more labor-intensive removal process.
Identifying the glue type helps you choose the right technique and influences the time and effort you’ll need to invest. For instance, the stubborn nature of resin-based glues requires patience and possibly different strategies compared to more forgiving mastic or general adhesive glues. Knowing what you’re dealing with lets you set realistic expectations for your project timeline.
Essential Tools and Materials
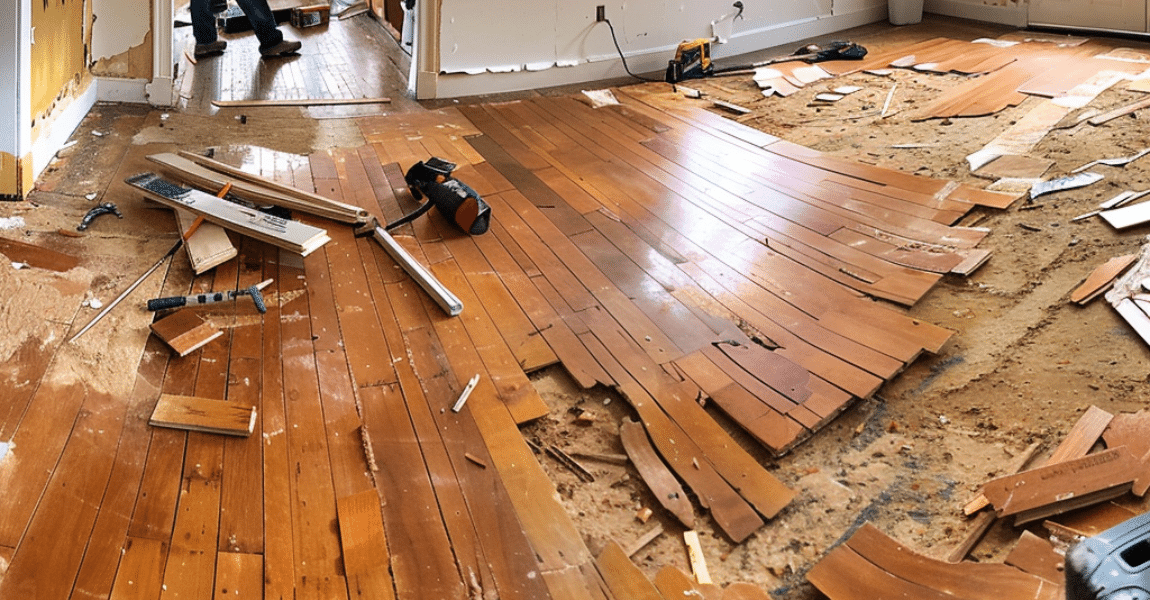
To effectively remove glued hardwood flooring, you’ll need a heavy hammer, chisel, circular saw, power scraper, and electric jackhammer. Each tool plays an essential role in the process, ensuring you can precisely tackle the job. The heavy hammer and chisel are vital for breaking up the tough adhesive, especially where it’s thickest. The circular saw is necessary for cutting sections of the flooring, making it easier to lift off in manageable pieces.
Remember to arm yourself with a robust floor scraper. This tool is indispensable, particularly when dealing with residual adhesive on concrete subfloors. It helps scrape off any remaining glue, leaving a cleaner surface for your next flooring installation.
Quick Tip: You can also use a floor stripper machine for scraping. These can be rented from tool rental stores for around $50-$100 per day. They use a wide blade to scrape up the wood and adhesive from the subfloor. I have personally used them, and they help a lot in scraping the glued hardwood floors.
Safety can’t be overlooked. Always wear protective gear, including safety glasses and sturdy boots. These precautions prevent injuries from flying debris or accidental slips.
Investing in quality tools speeds up the removal process and minimizes potential damage to the subfloor. It’s worth the upfront investment to avoid extra costs from repairs. Remember, using the right tools makes your work easier and ensures a better outcome.
Preparing the Work Area
Before beginning the removal of glued hardwood flooring, clear all furniture and obstacles from the room to establish a safe, open work area. This step guarantees you’ve got ample space to maneuver without tripping or damaging other items. Once the room’s empty, cover any remaining surfaces, like baseboards and adjacent floors, with drop cloths or plastic sheets. This protects them from the sticky debris and potential scratches as you work on the glued wood.
Next, prioritize your health and safety by making sure the room is well-ventilated. Open windows and set up fans to circulate air, reducing the buildup of any harmful fumes from the adhesive used on the flooring. Always wear protective gear, including safety glasses, gloves, and a dust mask. These precautions help you avoid irritation from dust and chemical vapors during the removal process.
Lastly, as you remove the glued hardwood, be mindful of how you dispose of the waste. To comply with local disposal regulations, place the debris in sealable bags or containers clearly labeled as hazardous. Proper disposal is vital to minimize environmental impact and adhere to legal requirements.
Applying Paint Remover
After preparing the work area, apply paint remover to soften the glue holding the hardwood flooring. This step is important as it makes the removal process smoother and less labor-intensive. Start by selecting a paint remover that’s effective for the type of glue under your hardwood floors. You might need to test different solvents to find the one that works best.
Once you’ve chosen your solvent, generously apply it to the glued areas. Give it some time to work—usually, the longer you let it sit, the easier the glue will come off. However, don’t let it dry out; it will lose effectiveness.
You might consider using a heat gun to gently warm the glue for tougher spots, making it even softer and easier to remove. Be careful not to overheat the area, as this could damage the subfloor or release harmful fumes.
After the glue has softened, use a razor blade or a drywall taping knife to scrape off the residue carefully. The razor blade can get under any remaining patches of glue, lifting them off the subfloor. Work slowly and methodically to avoid damaging the surface underneath. This method ensures that the subfloor remains in good condition for your next flooring installation.
Mechanical Removal Techniques
To effectively remove glued hardwood flooring, use mechanical removal techniques such as heavy hammers, chisels, circular saws, power scrapers, and electric jackhammers. These methods are efficient and minimize potential damage to your subfloor.
Start by gently breaking up the hardwood panels’ edges with a heavy hammer and chisel. This initial step loosens the panels from the adhesive and makes the following steps easier.
Next, you’ll want to switch to a circular saw. Set the blade to just deep enough to cut through the hardwood without damaging the subfloor. Cut the flooring into small, manageable sections. This segmentation simplifies the removal process, allowing you to pry up smaller pieces without exerting excessive force.
Heavy-duty power scrapers and electric jackhammers are invaluable for speeding up the process. These tools help break the bond between the hardwood and the adhesive quickly, lifting large sections at a time. Here’s a quick guide to choosing the right tool:
| Tool Type | Purpose | Best For |
|---|---|---|
| Heavy Hammer | Initial loosening of panels | Edges and smaller areas |
| Circular Saw | Cutting flooring into manageable pieces | Creating easy-to-remove sections |
| Power Scraper | Lifting sections of the flooring | Large areas with stubborn adhesive |
| Electric Jackhammer | Breaking stronger adhesive bonds | Quick removal of large sections |
| Chisel | Detail work and adjustments | Fine-tuning and edge work |
Using these tools in combination ensures a thorough and efficient removal of your glued hardwood flooring.
Using Heat for Softening Glue
While mechanical tools effectively break down the physical structure of glued hardwood floors, applying heat with a heat gun can soften the adhesive for easier scraping. Using a heat gun is a precise method that targets the tough glue holding your hardwood floors down. Here’s how you can effectively use a heat gun in this process:
- Select the Right Heat Setting: Start with a lower heat setting to avoid damaging the wood. You can gradually increase the temperature if the glue doesn’t begin to soften.
- Apply Heat in Sections: Work in small, manageable sections. This controlled approach helps to make certain that you only soften the glue you’re ready to work on, preventing it from hardening again before you get to scrape it off.
- Monitor the Heat Application: Keep the heat gun moving to avoid concentrating too much heat in one spot, which could discolor or burn the wood.
- Timing Your Heat Application: Generally, a few minutes per section should suffice. You’ll know it’s time to move on when the glue becomes tacky and easier to manipulate.
This method makes the task less labor-intensive and preserves the quality of your subfloor. Remember, patience is key—you’ll get better results with careful, methodical heating than rushing through the process.
Scraping the Glue Off
Once you’ve softened the glue with a heat gun, use a heavy hammer and chisel to chip away at the glued hardwood flooring carefully. This process requires patience and precision to make sure you don’t damage the subfloor underneath. Start from one end and work your way across, lifting sections of the flooring as they come loose.
If you find the manual chiseling too laborious, consider renting a power scraper or an electric jackhammer from a tool rental. These tools can greatly speed up the process, especially for larger areas. Just be sure to handle these power tools with care to maintain the integrity of the subfloor.
As you progress, you’ll likely encounter patches of remaining glue. While addressing these spots, which will come later, it’s important to clear as much surface glue as possible. Work in small, manageable sections and take breaks if needed to avoid fatigue. The goal here is to remove the bulk of the flooring and glue, preparing the surface for finer cleaning and finishing tasks ahead.
Addressing Stubborn Glue Spots
How can you effectively tackle those stubborn glue spots remaining on your hardwood floors? When your usual scraping methods don’t seem to do the trick, you might need to bring in some heavier artillery. Here’s a step-by-step guide to dealing with those pesky glue residues:
- Apply Heat: Use a heat gun to warm the glue spots on your wood flooring gently. The heat softens the adhesive, making it easier to scrape off. Be careful not to overheat the area, as this could damage the wood.
- Scrape the Glue: Use a putty knife or blade scraper to remove the adhesive once the glue is softened gently. Work slowly and carefully to avoid scratching the wood surface.
- Use Chemical Aids: If some residue stubbornly clings, apply a small amount of isopropyl alcohol or Goo Gone to break down the glue. Allow it to sit for a few minutes before scraping again.
- Specialized Tools: Consider using a chisel or a scraper designed specifically for linoleum for extremely tough spots. These tools can target and lift the glue without harming the underlying wood.
Cleaning and Finishing Up
After removing the glued hardwood flooring, start by wiping down the subfloor with a damp cloth to remove any leftover adhesive residue. This is particularly important if your floor is glued to a concrete base, as residue can be quite stubborn on such surfaces. Make sure to cover every inch to guarantee a clean slate for whatever comes next.
Next, examine the subfloor for signs of damage or imperfections. If you spot any issues, addressing them before proceeding is crucial. Repairing these areas will provide a stable, even surface for new flooring. Don’t rush this step; taking care now can save you trouble later.
Once you’re satisfied with the repairs, make sure the subfloor is completely dry. This prevents any mold or mildew from taking hold beneath your new flooring. Depending on your climate and the extent of cleaning needed, this could take some time.
To wrap up, apply a suitable primer or sealer. This ensures that whatever flooring you choose next adheres well without issues. If all this seems challenging, consider hiring a professional installer. They’ll make sure everything’s done right, leaving you with a beautifully finished floor.
Maintenance Tips Post-Removal
To maintain your subfloor after removing glued hardwood, you’ll need to inspect and clean it to prepare for new flooring thoroughly. Start by conducting a detailed subfloor inspection to identify any damages or residue left from the old flooring. Ensuring the subfloor is impeccably clean and damage-free is essential before moving on to the next steps.
Here are the key maintenance tips you should follow:
- Clean Thoroughly: Remove all traces of adhesive and debris. You can use specialized cleaning agents designed for subfloor cleaning to make sure all residues are gone.
- Let it Dry: After cleaning, allow the subfloor to dry completely. This step is important to prevent mold or mildew from developing under your new flooring.
- Apply Primer or Sealant: Consider applying a primer or sealant to the subfloor. This will help enhance the adhesion of the new flooring and provide a smoother surface, ensuring a better finish.
- Acclimate New Flooring: Follow the manufacturer’s recommendations for acclimating your new flooring materials. This prevents potential issues such as warping or gaps after installation.
Following these steps will help you establish a solid foundation for your new flooring, prolonging its life and maintaining its appearance.
Frequently Asked Questions
How Much Does It Cost to Remove Glued Down Hardwood Floors?
To have glued-down hardwood floors removed, you’ll typically pay between $2 and $4 per square foot. Prices may vary depending on the glue type, subfloor condition, and complexity of the job.
What Tool Is Used to Remove Glued Hardwood Floors?
To tackle your project, you’ll typically use tools like chisels, circular saws, power scrapers, and electric jackhammers to remove glued hardwood floors efficiently. Each tool helps handle different aspects of the removal process.
What Dissolves Wood Floor Glue?
You can use acetone, mineral spirits, white vinegar, or citrus-based solvents to dissolve wood floor glue. For a more targeted approach, opt for commercial adhesive removers designed specifically for this purpose.
Can I Reuse Hardwood Flooring After Removing It?
You can reuse hardwood flooring after removing it, but it depends on the condition of the wood and how carefully it’s extracted. Check for damage and make sure it’s still structurally sound.
How Do I Dispose of Old Hardwood Flooring Responsibly?
To dispose of old hardwood flooring responsibly, recycle it or donate it to reuse centers. Check local regulations for disposal options to ensure you’re not contributing to environmental harm with your discard.
Are There Eco-Friendly Alternatives to Chemical Adhesive Removers?
Yes, you can use eco-friendly alternatives like vinegar or citrus-based solvents. They’re effective and safer for the environment, ensuring you don’t rely on harsh chemicals to tackle your projects.
Conclusion
Now that you’ve tackled removing your glued hardwood flooring take pride in your accomplishment! Regularly clean the area to prevent debris buildup and inspect for any residual glue spots.
If you spot any, a bit of elbow grease should do the trick. Moving forward, keep these tips in mind for maintaining a pristine floor.
Remember, a little upkeep goes a long way in keeping your floors looking great and performing well for years to come.
