Start by gathering essential tools like a hammer, flat bar, nippers, and a circular saw. Don safety gear including glasses, gloves, and sturdy shoes. Remove baseboards with a utility knife and pry bar, then cut floor sections using your saw. Start lifting the boards at the wall edge, prying gently to maintain integrity. Carefully extract each board and remove any nails. Inspect and clean the wood, checking for damage and debris. Store the reclaimed wood with spacers for air circulation. With proper planning, you can transform the reclaimed boards into stunning new projects. Here’s how to make the most of each step.
Gather Necessary Tools
To reclaim hardwood flooring efficiently, start by gathering essential tools like a hammer, flat bar, and circular saw. These tools will help you in prying up the boards and cutting through any stubborn sections. Make sure you have a reliable circular saw, as it’s vital for making precise cuts without damaging the wood you want to salvage.
You’ll also need nippers for removing any nails that are hard to reach or deeply embedded in the wood. Nippers provide the leverage required to pull out those tricky nails without splintering the boards. A flat bar will be indispensable for prying up the boards carefully. Use it alongside your hammer to lift the boards without causing unnecessary damage.
Don’t forget to wear proper personal protective equipment (PPE) like safety glasses, a respirator, gloves, and sturdy shoes. This gear will keep you safe from flying debris, dust, and potential injuries. Also, consider knee pads for added comfort, as you’ll be spending considerable time on your knees.
Having all these tools ready and in good condition will streamline the process, making it easier and more efficient to reclaim your hardwood flooring.
Remove Baseboards
With your tools ready, start by carefully removing the baseboards using a utility knife and pry bar to avoid damage. Begin by sliding the utility knife along the top edge of each baseboard to cut through any caulk or paint sealing it to the wall. This step is important as it prevents the paint from peeling and helps in preserving the baseboards’ quality.
Next, gently insert the pry bar between the wall and the baseboard. Work slowly and methodically, prying the baseboard away from the wall bit by bit. It’s vital to be patient here; rushing can lead to cracking or splintering the wood. Once you’ve loosened a section, gradually work your way along the entire length of the baseboard.
As you remove each piece, label it on the back with its original location. This step will make reinstallation much easier later on. Store the labeled baseboards in a safe, dry place to make sure they remain in good condition.
Removing the baseboards is an important first step in reclaiming hardwood flooring. Properly doing so not only protects the baseboards for future use but also sets the stage for the rest of your project.
Cut Floor Sections
Begin the cutting process by setting your circular saw to the appropriate depth for your hardwood flooring. This guarantees you don’t damage the subfloor beneath.
Next, position your saw along the first section you plan to remove. Cutting sections into manageable sizes will make the removal process much easier and more controlled.
Using the circular saw, make a series of cuts along the length of the floorboards, focusing on the areas close to the walls. This approach helps in prying up the boards without causing damage to the surrounding areas. Strive for precise cuts to keep the boards intact, which is essential if you plan on reusing the hardwood.
As you’re cutting sections, be systematic. Start from one side of the room and work your way across to make sure you don’t miss any areas. This methodical approach will help you reclaim the flooring efficiently.
Make sure to always double-check the depth setting on your saw before each cut to prevent mistakes. With careful cutting, you’ll set yourself up for an easier removal process, making it simpler to lift the first board and move forward in your project.
Lift First Board
To lift the first board, start by locating a suitable starting point along the wall.
Pry gently with a flat bar to maintain the board’s integrity.
Taking caution during this step guarantees the rest of the process goes smoothly and efficiently.
Locate Starting Point
Your first step in reclaiming hardwood flooring is to identify the starting point by lifting the first board along a wall. This starting point is important because it sets the tone for the rest of the board removal process.
Begin by examining the edges where the floor meets the wall. Look for a spot where you can easily access the edge of a board, typically at a corner or near a doorway.
Once you’ve pinpointed your starting point, use the appropriate tools and techniques to begin lifting the first board. A pry bar or a chisel can be effective for this task. Gently insert the tool between the board and the subfloor, applying gradual pressure to avoid damaging the surrounding boards or the wall.
It’s often helpful to cut along the wall’s edge using a saw, which makes lifting the first board easier and cleaner.
Take your time and use caution during this initial board removal. Properly lifting the first board sets the stage for a smoother reclaiming process and minimizes potential damage.
Pry With Care
With the starting point identified, it’s vital to pry up the first board with care to preserve its condition and set a positive precedent for the rest of the project. Begin by ensuring that the tongue of the board is facing you. This positioning minimizes the risk of damaging the grooves, which is important for a successful salvage process.
Use a flat bar, hammer, and pry bars to carefully lift the first board. Gently insert the flat bar between the board and the subfloor, tapping it with the hammer to get a good grip. Once the flat bar is in place, use a crowbar to continue prying, ensuring you’re pulling at a slight angle to reduce the chance of splintering or breakage.
Here’s a quick rundown to keep you on track:
- Position the tongue facing you: Prevents groove damage.
- Use appropriate tools: Flat bar, hammer, and crowbar.
- Pry at an angle: Helps avoid splinters.
- Lift gently: Maintains board integrity.
Maintain Board Integrity
Lifting the first board with care is essential to maintaining its integrity and setting up the rest of the project for success. Start by ensuring the tongue of the first board is facing you. This positioning is important because it allows you to pry up boards properly, minimizing the risk of damaging their structure. By focusing on preserving board integrity from the very beginning, you’ll find the rest of the removal process much smoother.
Use a pry bar to gently lift the first board. Insert the tool between the board and the subfloor, applying steady pressure to avoid splitting the wood. Make sure to work along the length of the board, not just in one spot. This method helps maintain the first board integrity, making it easier to remove subsequent boards without causing any unnecessary damage.
Once the first board is successfully lifted, you’ll notice that preserving its integrity sets the tone for the entire project. You can now continue to pry up boards properly, ensuring each one comes up with minimal effort and maximum preservation.
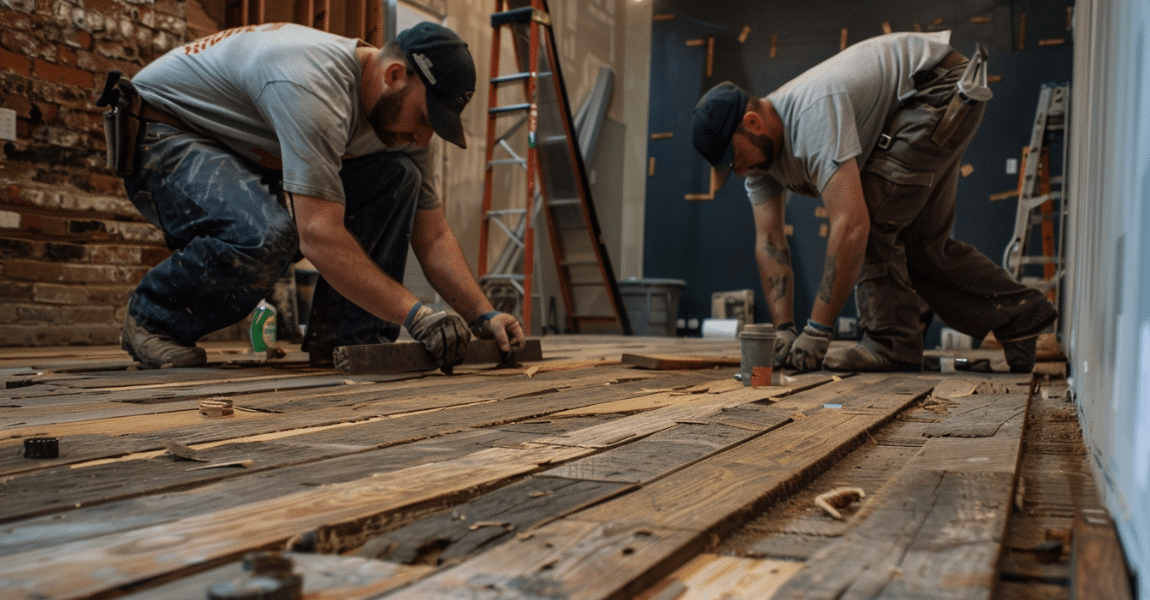
Extract Remaining Boards
Carefully pry up the remaining boards using tools like a flat bar or crowbar. Start from one end and work your way across the room, making sure that you don’t rush the process. The goal is to extract the remaining boards intact, so you can reuse them later.
To make things easier, you might consider using a circular saw to cut the ends of the flooring before prying them up. This can help loosen the boards without causing damage.
Here’s what you need to do:
- Use a flat bar or crowbar: These tools are perfect for getting under the boards and lifting them without breaking.
- Employ a circular saw: Cut through stubborn sections to facilitate the prying process.
- Work patiently: Don’t hurry; careful prying ensures the boards stay in good shape.
- Clean as you go: Keep the area tidy to avoid tripping or damaging the boards.
After you extract the boards, remember that nails will still be embedded in them. This is important for the next steps, but for now, focus on getting each board out carefully. Be meticulous and take your time to salvage as much of the hardwood as possible.
Remove Nails Safely
Removing nails safely is essential to preserve the quality and integrity of your reclaimed hardwood boards. Start by using pliers or a claw hammer to gently pull out nails. This method minimizes damage and helps you retain the integrity of the wood.
For nails that are difficult to extract, consider using a grinder. Grinding the nails off the bottom of the board ensures a safe and efficient removal process, preventing any unnecessary harm to the hardwood.
If you’ve got newer brad nails, snip them close to the surface and use a nail punch to push them back. This technique helps avoid splitting or cracking the wood, which is vital when you aim to salvage hardwood in the best possible condition.
Removing all the hardware before sorting the flooring into quality piles will streamline your salvaging process and make sure the boards are ready for reuse.
Carefully removing nails is key to making the most of your reclaimed hardwood. By taking these steps, you’ll be able to salvage hardwood effectively and maintain the integrity of your boards, ensuring they’re in excellent condition for future projects.
Inspect Wood Condition
When inspecting the reclaimed hardwood flooring, start by checking for water damage, which can compromise the wood’s integrity.
Next, assess the surface wear to confirm the planks are at least 1/8 inch thick and can be reused.
Check for Water Damage
Spotting signs of water damage, like warping, discoloration, or mold, is vital for maintaining your hardwood flooring. You need to inspect your floors regularly to catch any issues early. Water damage can compromise the structural integrity of your hardwood, leading to costly repairs or even replacements if left unchecked.
To effectively check for water damage, keep an eye out for these signs:
- Warping: Boards that are bent or twisted can indicate prolonged exposure to moisture.
- Discoloration: Dark or stained patches are often a sign of water penetration.
- Mold: The presence of mold or mildew is a clear indication of moisture problems.
- Softness: Wood that feels spongy or shows signs of rot is a serious concern.
Don’t forget to inspect the subfloor underneath your hardwood. Water can seep through the boards and damage the subfloor, leading to more extensive issues. Addressing these problems promptly can prevent further deterioration.
If you notice any of these signs, it’s essential to take action immediately to avoid more significant damage down the line. By being proactive, you can maintain the beauty and longevity of your hardwood flooring.
Assess Surface Wear
To evaluate surface wear on your hardwood flooring, check for visible signs like scratches, dents, and discoloration. These indications can provide valuable insights into the condition of the wood. Scratches and dents might be superficial, but they can also reveal deeper issues if they’re extensive. Discoloration often points to past water damage or prolonged exposure to sunlight, which can weaken the wood over time.
Next, assess the thickness of the planks. Hardwood flooring needs to be at least ⅛ inch thick to be reusable. If the planks are too thin, they won’t withstand refinishing processes and could compromise the floor’s durability. Measure several boards at different spots to confirm uniform thickness.
Pay close attention to the edges and ends of the boards. Surface wear along these areas can impact the structural integrity of the flooring. If you notice significant wear or damage, it might be difficult to securely fasten the boards when reinstalling them.
Identify Structural Issues
Regularly inspect the hardwood flooring for signs of pests, water damage, and warping to verify it’s in good condition for reclamation. Start by examining the wood’s condition closely. It should be at least ⅛ inch thick for it to be reusable. Look out for visible damage such as insect holes, rot, or mold. These can severely affect the quality and structural integrity of the wood, making it unsuitable for future projects.
Inspecting for structural issues is important to guarantee a successful reclamation process. Here are some key points to keep in mind:
- Pests: Look for small holes or sawdust, which may indicate insect infestations.
- Water Damage: Check for discoloration, softness, or swelling in the wood.
- Warping: Examine the planks for any bending or twisting that could make them difficult to reuse.
- Thickness: Ensure the wood is at least ⅛ inch thick to maintain its durability and strength.
Clean Salvaged Boards
When cleaning salvaged boards, start by removing any dirt, debris, or old finish with a stiff brush or vacuum. This initial step is vital for preparing the wood for further treatment.
Once you’ve got the boards free from loose particles, use a wood cleaner or a mild soap solution to gently scrub the boards. Be careful not to use harsh chemicals or excessive water, as these can damage the wood fibers and safeguard the integrity of the boards.
After cleaning, it’s important to let the boards dry completely. This guarantees that no moisture remains trapped within the wood, which could lead to warping or mold growth later on.
While the boards are drying, take the time to inspect for nails, staples, or any metal fragments. Removing these will prevent damage during installation and ensure a smooth, safe surface for your reclaimed hardwood floor.
Store Reclaimed Wood
Storing reclaimed wood properly is crucial to maintaining its quality and longevity. You need to make sure that the wood is kept in a dry, well-ventilated area to prevent warping or mold growth. This means you should store it off the ground and away from any sources of moisture. By doing so, you help maintain the wood’s integrity and usability for future projects.
To store reclaimed wood effectively, follow these key steps:
- Use spacers: Stack the wood with spacers between each layer to allow air circulation and prevent the pieces from sticking together.
- Label everything: Clearly label the wood pieces for easy identification and organization when it’s time to reuse them.
- Cover the wood: Consider covering the stored wood with a tarp or plastic sheet to protect it from dust and potential damage.
- Elevate the wood: Keep the wood off the ground to avoid any contact with moisture that could lead to deterioration.
Plan Reuse Projects
When planning your reuse projects, start by evaluating the wood’s condition to confirm it’s suitable for your needs.
Next, design a new layout that maximizes the reclaimed flooring’s potential.
Assess Wood Condition
Begin by thoroughly inspecting your hardwood flooring for any signs of pest damage, warping, or water damage. This initial assessment is vital to determine the wood’s condition and whether it’s suitable for reuse. Pay close attention to the thickness of the planks; they should be at least ⅛ inch thick to guarantee they can withstand future use. By properly evaluating the wood condition, you can make informed decisions about your reclamation projects.
When you inspect hardwood flooring, consider the following key factors:
- Pest Damage: Look for tiny holes or sawdust, which may indicate termites or other wood-boring insects.
- Warping: Check for any bending or twisting in the planks, which can affect how they lay in new projects.
- Water Damage: Identify any discoloration or swelling that could compromise the wood’s integrity.
- Plank Length: Prioritize longer planks, as they’re easier to repurpose and offer more flexibility in future designs.
Design New Layout
Once you’ve assessed the wood’s condition, it’s time to creatively design new layouts that maximize the use of your reclaimed hardwood flooring. Start by considering the dimensions and shape of each salvaged board. Not all reclaimed wood will be uniform in size, so plan your layout design to accommodate these variations.
Think about the areas you want to cover. For a floor, you might use the longer boards for main spaces and shorter pieces for borders or smaller rooms. For walls or ceilings, the layout design can be more flexible, allowing you to use those irregular-sized salvaged boards.
Next, assess the quantity of reclaimed wood you have. This will help you determine if you have enough material for your intended project. If you’re short on boards, consider combining the reclaimed wood with new materials for a contrasting effect.
Explore creative ways to repurpose your reclaimed wood. Use it for furniture, decorative wall panels, or even as unique stair treads.
Each piece of salvaged hardwood tells a story, and your new layout design should highlight its character while making the most of available resources. This careful planning guarantees your reclaimed wood will shine in its new setting.
Frequently Asked Questions
Can You Reclaim Hardwood Floors?
Yes, you can reclaim hardwood floors. You’ll need to assess the wood’s condition and thickness, then use proper tools for removal. After de-nailing and cleaning, the wood can be repurposed for various projects or sold.
What Is the Best Way to Salvage Hardwood Floors?
The best way to salvage hardwood floors is to remove the trim, cut the ends, and carefully pry up the boards. Make sure to categorize the wood by quality and save any reusable nails for future projects.
What Is the Best Way to Restore Hardwood Floors?
To evaluate hardwood floors, start by gauging their condition. Sand the surface to remove old finishes, then stain and seal the wood. Use quality products and tools for the best results, ensuring your floors look stunning and new.
Can I Restore a Hardwood Floor Without Sanding?
Yes, you can restore a hardwood floor without sanding. Use a wood floor cleaner, buff the surface, and apply a new finish. This method is perfect for floors with minimal damage or wear.
Conclusion
You’ve successfully reclaimed your hardwood flooring. With the right tools and careful extraction, you can now inspect, clean, and store your salvaged wood for future projects.
Remember, these reclaimed boards can add unique character and charm to any new design. Whether you’re planning to reuse them in a new flooring project or for a creative DIY venture, you’ve got a valuable, eco-friendly resource ready to go.
Enjoy the fruits of your labor!
