When it comes to leveling a subfloor, whether it’s wood or concrete, you need a clear strategy. Start by inspecting for any high and low spots that could affect your flooring. For wood subfloors, sanding down high areas is often the best approach, while low spots might require some added support. But when it comes to concrete, the process shifts completely. Understanding the right techniques is essential, and there’s more to explore.
Floor Inspection and Preparation Steps
Before you begin leveling your subfloor, it’s essential to conduct a thorough inspection to identify any defects that could impact your flooring installation. Check for cracks and unevenness, as these issues must be addressed to meet floor flatness tolerance. Assess moisture content to guarantee compatibility with your flooring materials and monitor environmental conditions like temperature and humidity for ideal installation. Proper subfloor material selection impacts flooring installation success, so make sure the subfloor material meets the requirements of your chosen flooring type. A detailed inspection report can help facilitate easier resolution if defects arise post-installation. Additionally, understanding the type of flooring you plan to install will help you determine the necessary preparation and leveling approach. After completing the inspection, consider utilizing a Floor Inspection Checklist to ensure all critical aspects are covered.
Once the inspection is complete, clean the subfloor, level it, and consider priming or adding a moisture barrier to guarantee proper adhesion and protection for your new flooring. Remember that a level subfloor is crucial for ensuring a successful flooring installation.
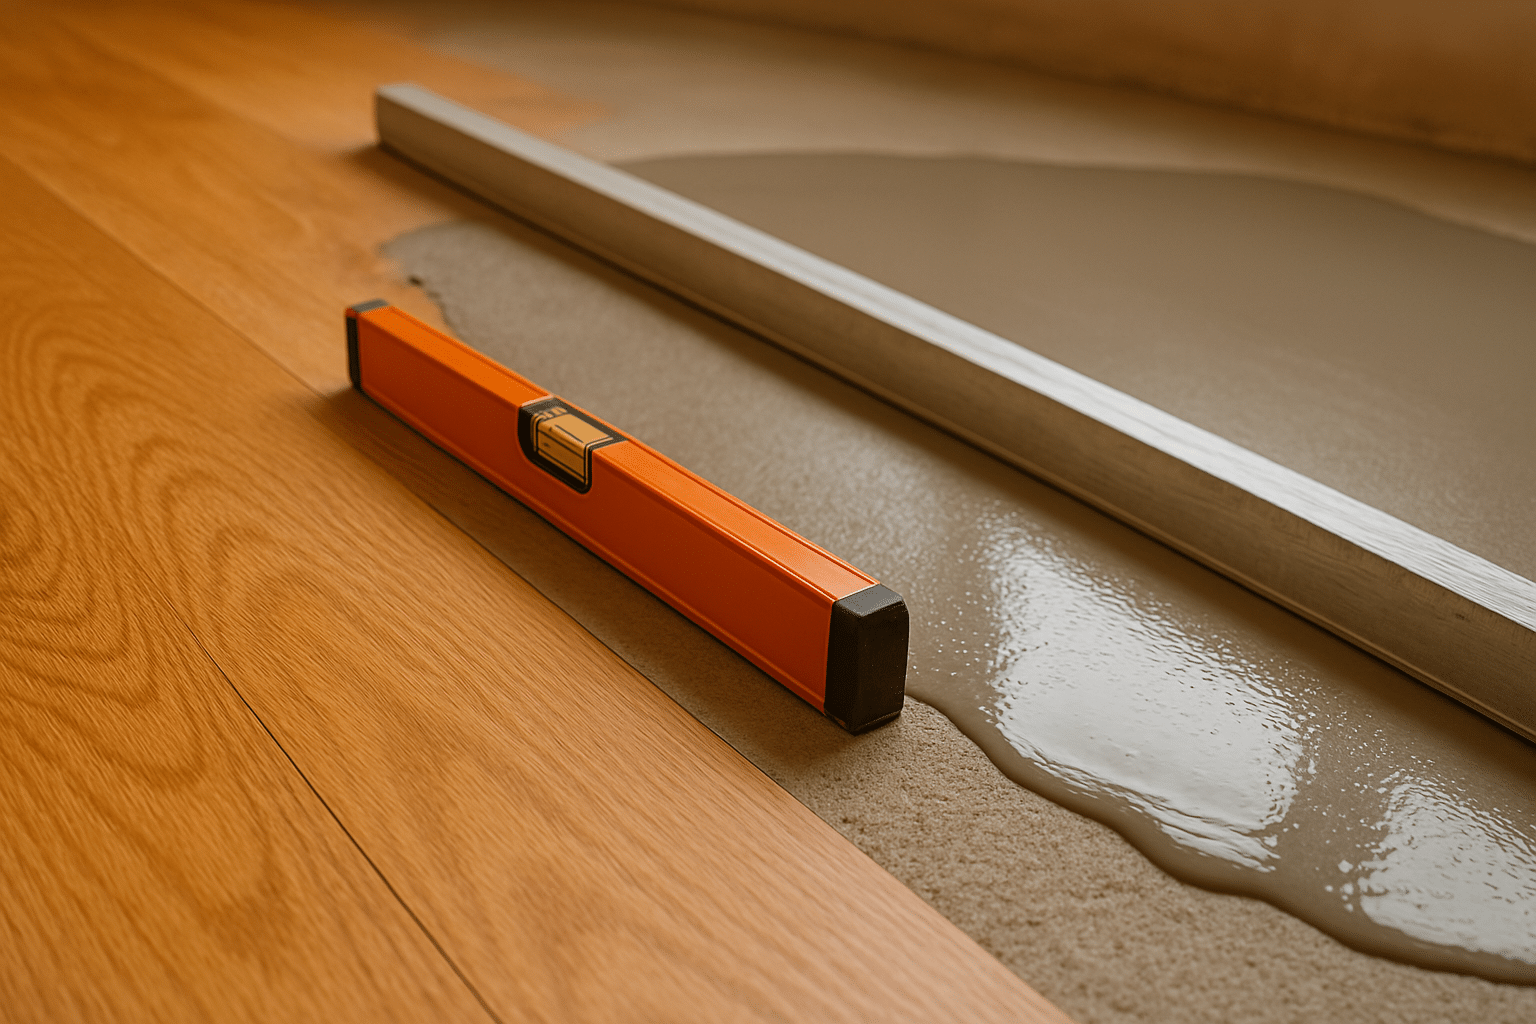
Identifying High and Low Spots
To guarantee your subfloor is ready for installation, identifying high and low spots is essential.
Start by using the right tools to detect unevenness effectively. Here are some methods to take into account:
- Straightedge and Level: Place a straightedge on the floor to check for gaps or rocking, indicating high or low spots.
- Laser Levels: Set up a laser level to project a straight line across the room, helping you find deviations. This tool is particularly effective because it uses a laser transmitter to identify high spots on the floor.
- Marble Method: Roll marbles on the floor to visually detect lower areas, revealing invisible low spots. Thoroughly assessing floor conditions is crucial to avoid complications during the leveling process. Additionally, understanding the common causes of uneven floors can help in diagnosing the issue more effectively. To ensure a successful flooring installation, the subfloor must be clean, dry, level, and structurally sound.
Mark any identified high and low spots using a pencil or Sharpie for future adjustments.
Sanding Down High Spots in Wood Subfloors
Sanding down high spots in wood subfloors is an important step to achieve a level surface for your flooring installation.
Start by securing all fasteners and removing any obstructions. Use a random-orbit sander with coarse-grit sandpaper (60-80 grit) for effective sanding. It is crucial to ensure the subfloor is flat within 3/16 inches over a 10-foot span to avoid issues during installation. Proper subfloor preparation leads to flatter wood floors and enhances the overall quality of your installation.
Identify the highest spots and sand gradually, checking your progress with a straightedge. Be careful not to over-sand, as this can weaken the subfloor. Feather out the sanded areas to blend them with the surrounding surface.
After sanding, thoroughly vacuum the area to remove dust and debris. Finally, re-check the level of the subfloor to confirm it’s even before proceeding with your flooring project.
Proper sanding of plywood subfloor is vital for a smooth finish.
Adding Plywood Underlayment for Stability
When you add plywood underlayment, choosing the right thickness is essential for stability and performance. The thickness of the plywood is crucial in ensuring that it can adequately support the load and prevent deflection. Additionally, a high-quality plywood underlayment can enhance sound insulation and improve the overall comfort underfoot. You’ll also want to guarantee proper fastening techniques to secure the panels effectively, while managing expansion gaps to accommodate any shifts. Each of these steps plays an important role in creating a solid foundation for your final flooring.
Plywood Thickness Selection
Selecting the right plywood thickness for underlayment is essential for guaranteeing stability and longevity in your flooring project. Your plywood thickness selection should depend on the condition of your subfloor and the type of flooring you intend to install. Here are some common thicknesses to take into account:
- 1/4 inch: Ideal for resilient flooring over smooth subfloors.
- 19/32 inch: Great for hardwood and laminates, minimizing flex.
- 23/32 inch: Best for high-load areas or uneven subfloors.
Using APA-rated plywood assures durability and strength, while thicker panels provide a solid base for your flooring. Additionally, the sound transmission reduction offered by plywood underlayment can enhance the overall comfort of your space. Furthermore, a level floor is critical as it ensures furniture sits evenly and minimizes wear on flooring materials. Remember to assess your subfloor’s condition before making your choice, as this can greatly influence your plywood thickness selection. Choosing the right thickness also contributes to the structural integrity of the flooring system, preventing issues like sagging over time.
Proper Fastening Techniques
To guarantee your plywood underlayment is securely fastened, it’s essential to choose the right fasteners and techniques. Use high-quality fasteners like SCRAIL® SUBLOC PRO, which combine the speed of a nail with the holding power of a screw. Proper fastening techniques involve placing fasteners at intervals that align with joists for maximum support. Make sure to repair any damaged areas on the subfloor before installation, and consider applying adhesive between the plywood panels to reduce squeaks. Additionally, the choice of subflooring material can greatly influence the overall stability of your flooring. Incorporating engineered lumber benefits ensures a strong and straight foundation for your underlayment. Consistent fastening patterns ensure high-quality subfloor installation and help prevent future issues. Avoid over-tightening by not using a sledgehammer, as this can damage the panels. Following these steps will help you effectively level a subfloor and achieve a stable, long-lasting underlayment.
Managing Expansion Gaps
Although many overlook them, managing expansion gaps is essential for the stability and longevity of your plywood underlayment. These gaps allow your underlayment to expand and contract with temperature and humidity changes, preventing structural issues. A recommended gap of 1/8 inch between plywood sheets ensures proper movement without compromising the integrity of your flooring. It is important to note that membrane application over plywood is advised for better results and enhanced stability in your flooring installation. Additionally, using plywood underlayment provides a smooth, flat surface that can help minimize imperfections in the flooring above.
Here are some best practices to follow:
- Maintain gaps of 1/8 inch to 1/4 inch between plywood sheets.
- Use flexible fillers instead of rigid materials to accommodate seasonal movement.
- Stagger joints and guarantee proper fastening for enhanced stability.
Using Self-Leveling Compounds on Concrete Subfloors
When you’re ready to level a concrete subfloor, using self-leveling compounds can be a game changer for your project. Start by preparing the surface; clean it thoroughly and prime it with a suitable primer for proper adhesion. Fill large gaps before applying your self-leveling underlayment concrete to guarantee a smooth finish. Proper subfloor preparation is essential for successful flooring installation. Additionally, it’s important to note that this compound is ideal for creating flat and economical substrates prior to final floor finishes. It’s crucial to ensure a level surface before applying the Schluter prefabricated pan for optimal results.
| Self-Leveling Compound Type | Benefits |
|---|---|
| Cement-Based | Cost-effective, durable |
| Polymer Modified | Enhanced flexibility |
| Water-Based | Quick drying |
| Latex-Modified | Excellent adhesion |
| Fiber-Reinforced | Crack resistance |
Choosing the right compound is essential. Assess your specific conditions and select a type that suits your flooring needs for a successful installation.
Application Techniques for Self-Leveling Materials
When applying self-leveling materials, you’ll want to start with proper mixing to achieve the right consistency. Correct mixing is crucial for ensuring that the self-leveling compound flows smoothly and adheres well to the subfloor. Additionally, make sure to check the moisture requirements of the substrate before application to avoid issues with adhesion. Once mixed, pour and spread the compound efficiently across the surface for even coverage. Finally, understanding the drying and finishing steps will guarantee your subfloor is ready for the next phase of your project. Proper surface preparation is essential to ensure good bonding and to prevent issues such as loose or debonding layers.
Mixing Self-Leveling Compound
To achieve a smooth and even subfloor, mixing self-leveling compound correctly is vital. Start by evaluating your floor and preparing your tools.
Here are key tips for effective mixing:
- Use the right tools: A drill with a mixing blade is essential for a thorough mix.
- Aim for the right consistency: You want a runny pancake batter or milkshake texture for ideal coverage. Ensure that you mix mortar for about two minutes to reach the correct consistency. Additionally, self-leveling compound is designed to cover uneven surfaces effectively, making it crucial for leveling. Remember that thorough mixing is essential to meet quality requirements and avoid unsatisfactory finishes. Before starting, make sure you prepare your workspace to handle the cement compound efficiently.
- Follow the manufacturer’s instructions: Stick to the recommended water-to-powder ratio for best results.
Mix outdoors to minimize dust inhalation and guarantee proper ventilation. Generally, you’ll need to mix for about two minutes.
Avoid common mistakes like insufficient mixing or inconsistent ratios to achieve a flawless finish. Happy leveling!
Pouring and Spreading Techniques
Start pouring the self-leveling material at one corner of the room, letting it flow naturally across the surface. Use floor leveling tools like a gauge rake and squeegee to spread the material evenly. Be certain to mix multiple buckets of self-leveler to maintain a continuous flow and prevent interruptions. As you work, wear spiked shoes to safely walk on the wet surface, allowing you to access hard-to-reach spots. To achieve a smooth, lump-free consistency, ensure you mix only the amount that can be poured within 20-30 minutes. To eliminate air bubbles, utilize a spiked roller for a smooth finish. Keep an eye on temperature and humidity; avoid extreme conditions that could affect the curing process. Additionally, dampen the wood subfloor with a sponge before grinding to ensure better adhesion of the self-leveler. When working with self-leveling concrete, it is important to note that the compound can be poured up to a 1-inch thickness for optimal performance.
These pouring and spreading techniques will guarantee your subfloor is leveled correctly for a successful installation.
Drying and Finishing Steps
While applying self-leveling materials, it’s vital to pay attention to drying and finishing steps to guarantee a smooth, durable surface. The drying time for self-leveling compounds typically ranges from 2 to 24 hours, influenced by temperature, humidity, and air circulation. Additionally, self-levelling compound is essential for achieving a flat and even surface before installing new flooring. It is important to consider drying times for normal-drying compounds to ensure proper application and prevent future issues. Proper surface preparation is crucial for the success of the self-leveling process, as it helps to ensure strong adhesion and prevents issues like delamination.
Here are some key finishing techniques:
- Apply a primer to enhance adhesion.
- Use pin rollers to release trapped air and achieve even leveling.
- Inspect the surface post-application for imperfections.
Always follow manufacturer instructions for the best results.
Finishing Touches and Surface Smoothing
Once you’ve leveled your subfloor, it’s essential to focus on the finishing touches and surface smoothing to guarantee a flawless base for your flooring.
Start by sanding the surface using various grits, beginning with coarse grit to tackle imperfections and moving to finer grits for polishing. For larger areas, use power tools like floor sanders or grinders to efficiently smooth out the surface. Don’t forget manual scrapers for tight corners. Fill any gaps or joints with sealants to create a seamless finish. If you’re working with a concrete subfloor, consider applying self-leveling compounds to help level the concrete floor before tile installation. Proper subfloor preparation is crucial to ensure long-lasting performance of your new flooring. Regularly inspect your work to catch any remaining imperfections before proceeding, especially when using an angle grinder for sanding to achieve the desired aesthetics.
Final Verification and Cleaning Before Flooring Installation
After smoothing your subfloor, it’s time to verify everything is in order before you lay down the flooring. Start by conducting a thorough inspection to ascertain a solid foundation.
After smoothing your subfloor, inspect thoroughly to ensure a solid foundation before laying your flooring.
Here are key tasks to complete:
- Check for damage: Look for cracks, rot, or termite issues.
- Moisture test: Use a moisture meter to confirm your wood subfloor is dry enough.
- Clean the surface: Vacuum away dust, and remove any nails or screws. Ensure to check the moisture content (MC) of the wood subfloor using a calibrated moisture meter to prevent future issues related to moisture levels.
Be sure to document your findings and follow manufacturer guidelines for using a subfloor leveling compound for wood.
This guarantees your installation will be stable and durable, preventing future issues. Completing these steps gives you peace of mind before moving forward with your flooring project.
Frequently Asked Questions
What Tools Are Essential for Leveling a Subfloor?
To level a subfloor, you’ll need an electric planer, orbital sander, drill, screws, and vacuum for wood. For concrete, grab an angle grinder, diamond wheel, vacuum, self-leveling compound, and trowel for effective results.
How Long Does It Take for Self-Leveling Compounds to Dry?
Self-leveling compounds typically dry in four to 24 hours, depending on thickness and environmental conditions. For best results, always check manufacturer guidelines and guarantee good air circulation to speed up the drying process.
Can I Level a Subfloor Without Removing Existing Flooring?
Yes, you can level a subfloor without removing existing flooring. Consider using underlayment or self-leveling compounds to fill gaps. Just make certain the current surface is suitable and in good condition before proceeding.
What Type of Primer Should I Use for My Subfloor?
You should choose a primer based on your subfloor type. For plywood, go with latex-based; for OSB, use water-based. Concrete needs epoxy or specialized primers. Always consider moisture levels and the specific flooring materials you’ll use.
How Do I Know if My Subfloor Is Structurally Sound?
To determine if your subfloor’s structurally sound, check for sagging, squeaks, or water stains. Use a level to assess flatness, and consider hiring a professional if you notice significant issues or damage. Regular maintenance helps, too.
Conclusion
To sum up, leveling your subfloor—whether wood or concrete—ensures a solid foundation for your flooring. By carefully inspecting for high and low spots, you can effectively use sanding, plywood underlayment, or self-leveling compounds to achieve a flat surface. Don’t forget to apply finishing touches and verify everything is smooth before installation. With these techniques, you’ll create a stable base that enhances the longevity and appearance of your new floors. Happy renovating!
References
- https://www.thespruce.com/fixing-wavy-wood-subfloor-1821092
- https://www.thisoldhouse.com/flooring/22397889/how-to-level-a-floor
- https://www.homedepot.com/c/ah/how-to-level-a-floor/9ba683603be9fa5395fab901a5944bfc
- https://www.floortraderofvirginia.com/custom/ccm0025/level-a-subfloor
- https://www.finehomebuilding.com/2018/11/07/the-secret-to-leveling-subfloors
- https://www.wagnermeters.com/moisture-meters/wood-info/subfloor-preparation/
- https://www.paneltown.com/how-to-level-a-floor/
- https://www.woodfloorbusiness.com/business/inspections/article/15124724/what-to-expect-during-a-wood-flooring-inspection
- https://safetyculture.com/checklists/floor-inspection/
- https://www.youtube.com/watch?v=qWsetaAKhwQ
