To make a slip tongue for hardwood flooring, start by selecting a matching hardwood piece. Measure the groove width and depth accurately using a caliper or tape measure. Cut the wood to fit, leaving it slightly longer for a snug fit, and sand the edges for smoothness. Apply wood glue evenly along the groove and let it become tacky. Insert the slip tongue gently, tapping it into place with a rubber mallet. Confirm a flush fit and allow it to dry in a well-ventilated area. For more detailed guidance and tips on achieving a seamless finish, keep on exploring.
Gathering Materials
To begin making a slip tongue for your hardwood flooring, gather a matching piece of hardwood. This step is important because the slip tongue needs to blend seamlessly with your existing wood flooring. Choose a piece of hardwood that matches the species, color, and grain pattern of your flooring boards to guarantee a uniform appearance.
Once you’ve selected the right piece of hardwood, check its dimensions. The slip tongue should be cut to fit the groove of the flooring boards it will be inserted into. It’s essential that the slip tongue has the correct thickness and width for a snug fit. If it’s too loose or too tight, it won’t function properly.
To achieve the precise dimensions needed, consider using tools like a table saw or a router. These tools will help you cut the hardwood to the exact thickness and width required.
After cutting, sanding the edges of the slip tongue is crucial. This will ensure a smooth fit into the groove of the flooring boards, preventing any issues during installation.
Measuring the Groove
To start, you’ll need to measure the width and depth of the groove in your hardwood flooring accurately. Use a caliper or measuring tape for precise dimensions, ensuring a proper fit for the slip tongue.
Taking multiple measurements helps you avoid errors and guarantees consistency.
Accurate Groove Dimensions
Accurate groove dimensions are essential for ensuring your slip tongue fits perfectly and enhances the overall look of your hardwood flooring. Start by measuring the width and depth of the groove in your wood flooring accurately. You can use a caliper or a measuring tape for this task. Precision is key here; even a slight discrepancy can lead to gaps or unevenness, compromising the professional appearance of your installation.
Typically, the standard dimensions for a slip tongue are around 11/16 inch or 3/4 inch in width and 48 inches in length. However, you should always double-check your specific groove measurements to confirm these standard dimensions will work for your project. Any deviation from the exact measurements could result in a loose or overly tight fit, which can cause issues down the line.
After taking your initial measurements, double-check them to confirm their accuracy. This second check will help you avoid any mistakes that could lead to an improper fit. Accurate measurements ensure that the slip tongue will fit snugly and securely, providing a seamless shift between your hardwood floorboards and enhancing the overall aesthetic of your flooring project.
Essential Measuring Tools
When measuring the groove for a slip tongue, a digital caliper or micrometer will provide you with the precise dimensions needed for a perfect fit. These tools are essential for guaranteeing that the width and depth of the groove are measured accurately. Precision is key because even the smallest discrepancy can impact the snugness and overall fit of the slip tongue, which, in turn, affects the stability and integrity of your hardwood flooring installation.
Using a digital caliper, you can easily measure the groove’s dimensions with high accuracy. Position the caliper’s jaws into the groove and read the measurement display to obtain the exact width and depth.
A micrometer works similarly and is especially useful for obtaining incredibly fine measurements, adding another layer of precision to your project.
Accurate measurements ensure that your custom slip tongue fits seamlessly into the groove, avoiding any gaps or loose fits that could compromise your flooring’s performance. By taking the time to measure correctly with these essential tools, you’ll create a slip tongue that not only enhances the look of your hardwood flooring but also guarantees its long-term durability and stability.
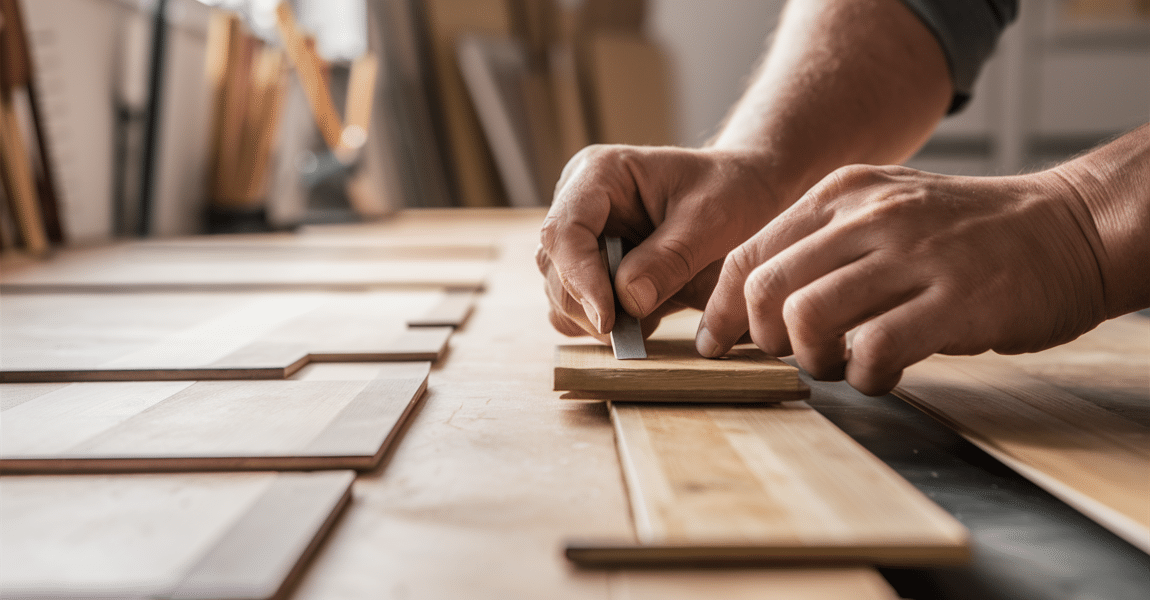
Cutting the Wood
Before you begin cutting, set up your table saw with the correct blade and safety guards. Start by measuring the piece of hardwood to the desired dimensions for the slip tongue. Precision is key, so make sure your measurements are accurate.
Once you have your measurements, feed the hardwood slowly and steadily through the table saw to guarantee a straight and precise cut.
After cutting, it’s essential to sand the edges of the hardwood piece. This step smooths out any rough edges that might create issues during installation. Use fine-grit sandpaper to gently sand all sides of the cut piece, ensuring a clean and polished finish.
Double-check the measurements and fit before you proceed any further. The slip tongue should be cut slightly longer than the width of the groove in your flooring. This ensures a tight fit and proper alignment during installation.
Insert the slip tongue into the groove to test its fit. It should slide in snugly without forcing.
Taking these steps will ensure that your slip tongue is accurately cut and ready for the next stage, providing a secure and seamless installation for your hardwood flooring.
Applying Wood Glue
To secure the slip tongue in place, apply a small amount of wood glue directly into the groove of the flooring board. Make sure you distribute the glue evenly along the entire length of the groove. This guarantees a secure bond that will hold the slip tongue firmly in place. Use a brush or a small applicator to spread the glue, being careful not to apply too much.
Excess glue can seep out when you insert the slip tongue, creating a mess and potentially weakening the bond. Once you’ve applied the glue, give it a few moments to become tacky. This will help it adhere better when you insert the slip tongue. Be patient and allow the glue to set for the recommended drying time before continuing with the installation. This waiting period is essential for ensuring a strong, durable bond that will stand the test of time.
If any glue does squeeze out during the insertion, immediately wipe it off with a damp cloth to keep the finish clean and professional. By taking these steps, you’re laying the groundwork for a seamless and sturdy hardwood floor installation.
Inserting the Slip Tongue
Gently slide the slip tongue into the groove, making sure it fits snugly and aligns perfectly. You’ll want to apply a small amount of glue to the groove to secure the slip tongue. With a steady hand, position the slip tongue and gently tap it into place using a rubber mallet. This guarantees a tight and secure fit. Be careful not to apply too much force, as this could damage the tongue or the groove.
After tapping, check for any excess glue that may have seeped out. Wipe it off immediately to keep the surface clean and smooth. It’s essential that the slip tongue is fully inserted and flush with the flooring to achieve a seamless installation. Here’s a quick reference to help you:
| Step | Action | Tools Needed |
|---|---|---|
| 1 | Apply glue to the groove | Wood glue |
| 2 | Slide slip tongue into groove | Hands |
| 3 | Tap gently into place | Rubber mallet |
| 4 | Wipe off excess glue | Cloth |
Following these steps ensures your slip tongue is properly installed, providing a solid and attractive hardwood floor. Remember, precision and care in this step will pay off in the final appearance and durability of your flooring.
Drying and Finishing
Now that you’ve inserted the slip tongue, it’s important to let it dry completely to avoid any warping.
Once dry, you’ll want to apply a suitable finish to match your hardwood flooring for a seamless look.
Remember to sand lightly between coats and make sure the finish dries fully before handling.
Proper Drying Techniques
Ensuring the slip tongue is properly dried is essential to preventing warping or damage during installation. Start by allowing the slip tongue to air dry in a well-ventilated area. This guarantees even drying and prevents potential issues. It’s important not to expose the slip tongue to direct sunlight or heat sources. Doing so can lead to cracking or uneven drying, which could compromise the integrity of your installation.
Position the slip tongue horizontally on a flat surface, making sure there’s enough space around it for air to circulate freely. Periodically check the slip tongue for any signs of warping or defects as it dries. This proactive approach helps you catch any issues early, ensuring a smooth installation process later on.
Once the slip tongue is completely dry, you can move on to applying a finish. This step is vital as it helps protect the wood from moisture and wear. However, before you get to finishing, make sure the slip tongue is free from any imperfections or defects. A well-dried, defect-free slip tongue will fit seamlessly, contributing to a flawless hardwood floor installation.
Finishing Touches Tips
Before installing the slip tongue, let it dry for at least 24 hours to guarantee a secure fit and prevent future issues. Once the drying period is complete, you’re ready to proceed with the installation.
Apply a thin, even layer of wood glue to the spline. This guarantees it adheres properly within the groove of the wood flooring.
Next, gently tap the slip tongue into place using a rubber mallet. Be careful not to strike too hard; just enough to secure it firmly without causing damage. Make sure the slip tongue sits flush with the surface of the flooring to avoid any unevenness that could impact the final look or feel of your floor.
After the slip tongue is securely in place, you can move on to finishing the hardwood flooring. Depending on your preference, finish the floor with stains, sealants, or other finishes to achieve a polished, professional appearance. This step not only enhances the aesthetic appeal but also provides additional protection to your hardwood floor.
Frequently Asked Questions
Can You Make Your Own Tongue and Groove Flooring?
Yes, you can make your own tongue and groove flooring. You’ll need precision tools like a table saw, router, and chisel to guarantee a snug fit. This DIY approach lets you customize dimensions and wood species.
How Do You Make Wood Floors Slip Resistant?
To make wood floors slip-resistant, apply anti-slip coatings or mats. Additionally, guarantee proper cleaning to remove dust and debris. For a more permanent solution, consider using a slip tongue during installation to enhance stability and durability.
Do You Nail Hardwood Flooring in the Tongue or Groove?
You should nail hardwood flooring through the tongue, not the groove. Nailing the tongue guarantees a secure, tight fit and prevents wood splitting. Follow the manufacturer’s guidelines for the best results and a professional finish.
How Do You Add Traction to Hardwood Floors?
To add traction to hardwood floors, use area rugs with non-slip backings, apply anti-slip treatments, and keep floors clean. Consulting a flooring professional can also provide tailored solutions for your specific needs.
Conclusion
You’ve now got the skills to make a slip tongue for your hardwood flooring. By gathering the right materials, measuring the groove accurately, cutting the wood precisely, and applying wood glue carefully, you can insert the slip tongue with ease.
Let it dry properly, and you’ll have a seamless finish. With these steps, you’ll guarantee your flooring project is both professional and durable.
Enjoy the satisfaction of a job well done!
